

How CVAT Stores It’s Dataset in Cloud?
CVAT can store its datasets in a cloud environment, such as Amazon Web Services (AWS) or Microsoft Azure.
The storage format and structure of the dataset are the same as when stored on a local server. However, there are some additional considerations when storing datasets in the cloud.
One of the primary benefits of storing datasets in the cloud is the ability to scale storage capacity based on demand. Cloud platforms like AWS and Azure offer a range of storage solutions, including object storage, file storage, and block storage. These solutions can be customized to meet the specific needs of your annotation project.
When storing datasets in the cloud, it is important to consider the security and privacy implications. You will need to ensure that the data is stored in compliance with any relevant data protection regulations, such as GDPR or CCPA. This may involve encrypting the data in transit and at rest and implementing access controls to prevent unauthorized access.
CVAT also provides cloud-based annotation services through its platform partners, including Scaleway and Neu.ro. These services allow you to upload your data to the cloud and have it annotated by a distributed team of annotators, without the need to manage the annotation process yourself
Why CVAT uses Cloud Storages ?
CVAT uses cloud storage for several reasons, including:
Scalability: Cloud storage provides a highly scalable solution for storing large datasets. With cloud storage, you can easily add or remove storage capacity based on your needs, without having to worry about managing hardware infrastructure.
Accessibility: Storing datasets in the cloud makes them accessible from anywhere with an internet connection. This is particularly useful for distributed teams or remote workers who need to access the data from different locations.
Collaboration: Cloud storage facilitates collaboration between team members working on the same project. By storing the data in a central location, team members can easily share files and collaborate on annotations.
Cost-effectiveness: Cloud storage can be a cost-effective solution for storing large datasets. With cloud storage, you only pay for the storage you use, and you can easily scale up or down as needed. This can be more cost-effective than managing hardware infrastructure in-house.
Data security: Cloud storage providers have robust security measures in place to protect your data from unauthorized access, data loss, or corruption. This can provide a higher level of data security than managing your data on-premises.
By using cloud storage, CVAT can provide a scalable, accessible, and secure solution for managing large annotation datasets, making it easier for teams to collaborate and work more efficiently.
Instructions on how to attach cloud storage using UI
In CVAT we can use AWS-S3, Azure Blob Container and Google cloud storages to store image datasets for your tasks. Here we will discuss how to attach AWS-S3 Storage.
Create a bucket
To create bucket, do the following:
- Create an AWS account.
- Go to console AWS-S3, and click Create bucket.
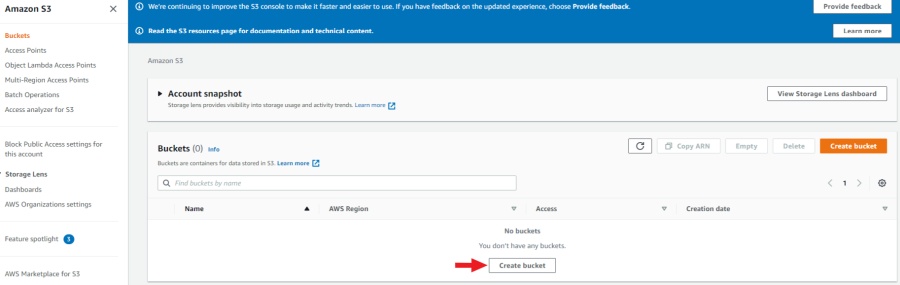
3. Specify the name and region of the bucket. You can also copy the settings of another bucket by clicking on the Choose bucket button.
4. Enable Block all public access. For access, you will use access key ID and secret access key.
5. Click Create bucket.
A new bucket will appear on the list of buckets.
Upload data
We need to upload data for annotation and the manifest.jsonl file.
- Prepare data.
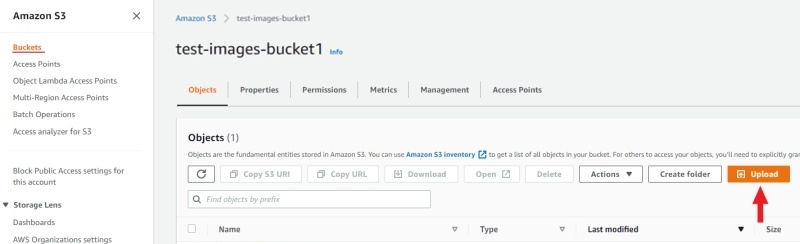
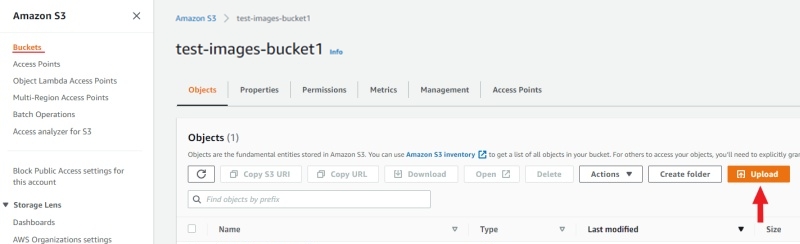
2. Open the bucket and click Upload.
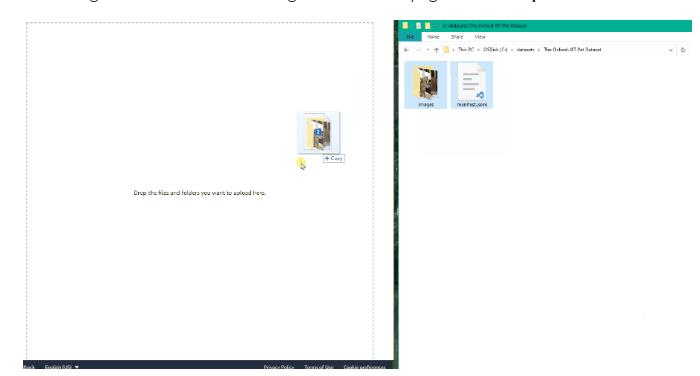
3. Drag the manifest file and image folder on the page and click Upload:
Access permissions
Authorized access
To add access permissions, do the following:
- Go to IAM and click Add users.
- Set User name and enable Access key – programmatic access
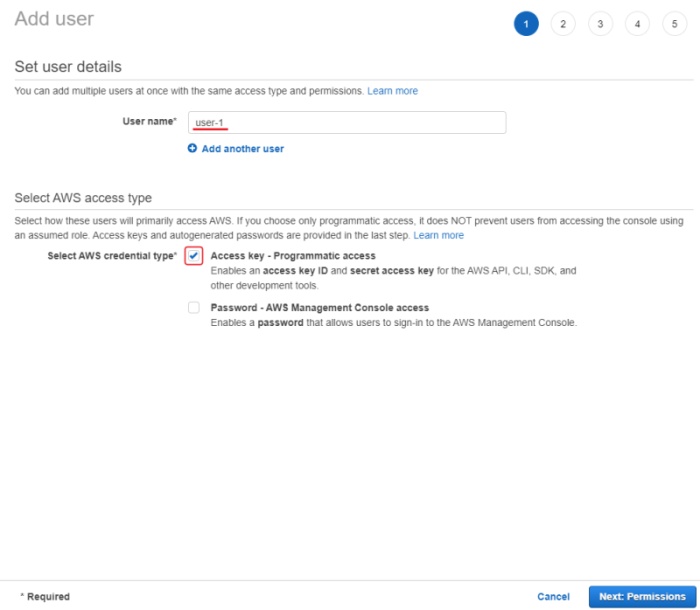
3. Click Next: Permissions.
4 .Click Create group, enter the group name.
5. Use search to find and select:
- For read-only access: AmazonS3ReadOnlyAccess.
- For full access: AmazonS3FullAccess.

6. (Optional) Add tags for the user and go to the next page.
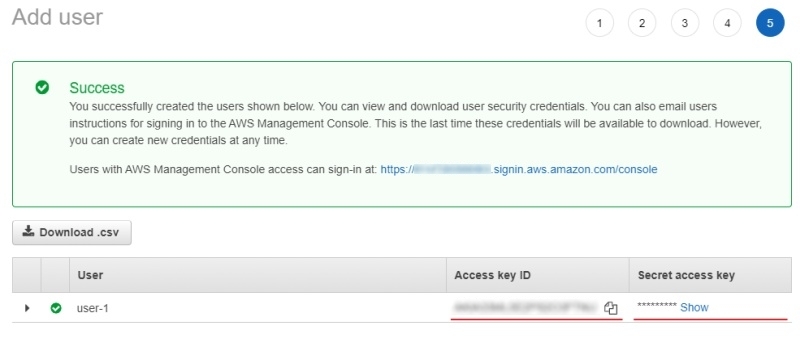
7. Save Access key ID and Secret access key.
Anonymous access
On how to grant public access to the bucket, see Configuring block public access settings for your S3 buckets
Attach AWS S3 storage
To attach storage, do the following:
- Log into CVAT and in the separate tab open your bucket page.
- In the CVAT, on the top menu select Cloud storages > on the opened page click +.
Fill in the following fields:
| CVAT | AWS S3 |
| Display name | Preferred display name for your storage. |
| Description | (Optional) Add description of storage |
| Provider | From drop-down list select AWS S3. |
| Bucket name | Name of the Bucket. |
| Authorization type | Depends on the bucket setup:
Key id and secret access key pair: available on IAM. Anonymous access: for anonymous access. Public access to the bucket must be enabled. |
| Region | (Optional) Choose a region from the list or add a new one. |
| Manifests | Click + Add manifest and enter the name of the manifest file with an extension. For example: manifest.jsonl. |
AWS manifest file
To prepare the manifest file, do the following:
- Go to AWS cli and run script for prepare manifest file.
- Perform the installation, following the aws-shell manual,
You can configure credentials by running aws configure.
You will need to enter Access Key ID and Secret Access Key as well as the region.
aws configure
Access Key ID: <your Access Key ID>
Secret Access Key: <your Secret Access Key>
- Copy the content of the bucket to a folder on your computer:
aws s3 cp <s3://bucket-name> <yourfolder> –recursive
- After copying the files, you can create a manifest file as described in preapair manifest file section:
python <cvat repository>/utils/dataset_manifest/create.py –output-dir <yourfolder> <yourfolder>
- When the manifest file is ready, upload it to aws s3 bucket:
- For read and write permissions when you created the user, run:
aws s3 cp <yourfolder>/manifest.jsonl <s3://bucket-name>
- For read-only permissions, use the download through the browser, click upload, drag the manifest file to the page and click upload.
Top of Form